Getting started with PHP (LEMP) on Vagrant, the easiest way
A software engineer tells to a colleague in his team "Man, it is working on your machine, but why is it not working on mine?", then they both find out that one has Ubuntu 12.04 LTS with PHP 5.3 and the other software engineer on which the code is working is Ubuntu 14.04 with PHP 5.5 after some investigation. If you have ever faced this or similar problem its high time to switch to a portable and a reproducible virtual development environment shared among all team members. This is a context where Vagrant comes into play.
If you have stack that involves many applications like PHP, Nginx, PHP-Fpm, Mysql, Rabbit MQ, Redis etc then making sure your team (even a small one with 3-4 members) have the same version for all above software will surely be a pain you don't want to take care of.
Vagrant also has alternatives, while many may argue that comparing Vagrant and Docker is comparing apples and oranges. In case of having a virtual machine for dev only they can be the two alternatives. Some early problems I faced with docker is, because it is a Linux container data persistence is an issue. Also for the development environment I don't think that linking 4 containers to get PHP, MySql, RabbitMq, Redis working is really practical.
If you look at the current popularity in Google they are performing head to head.
As for now for my local development environment I am happy with Vagrant over Docker.
This recipe is based on Network File System (NFS) to share the project files from a Linux host machine which does not work in Windows. For this tutorial you will need to download and install the following prerequisites.
How you install the above two will depend on your OS and if the OS is 32 bit or 64 bit. TO get NFS on your Ubuntu run : sudo apt-get install nfs-server.
After you have VirtualBox, Vagrant and NFS server installed on your host machine (main system preferably Ubuntu), then you can go to Puphpet.com.
Follow the steps on the left one after the other, check "Locally" in "Where do you want your virtual machine?" part of the "Deploy Target" step. All other things are quite obvious, be sure to select "NFS" on the "Shared Folder Type" part. Please select '../' in Box Sync Folder Source part so that the vagrant and other projects can be placed on the same folder.
If you have stack that involves many applications like PHP, Nginx, PHP-Fpm, Mysql, Rabbit MQ, Redis etc then making sure your team (even a small one with 3-4 members) have the same version for all above software will surely be a pain you don't want to take care of.
This post is going to be developer's perspective on using Vagrant as a virtualized development environment with minimal mention and coverage of the devOps and system side of Vagrant.
What is Vagrant
Vagrant is a container software that helps in creating virtual, lightweight, portable and reproducible development environment. Vagrant is a wrapper that can create a virtual machine using a provider like virtual box and a provisioner like puppet to create a server with exact requirements. It basically starts from a simple text file named Vagrantfile.Why Vagrant
There are many reasons to use a virtual development machine, some of them are:- The Vagrant virtual box is reproducible and portable so all the team members share it and have the same development environment with all the software in desired versions.
- Vagrant is OS agnostic, it runs on Linux, Mac and Windows. The main thing is the virtual machine which is generally a Linux distro. So your software engineers can even use windows but have the same virtual box shared.
- Vagrant saves time, earlier it used to take at least more than one day to setup a development machine and all the applications. Now as the machine is already setup its the time it takes to download and build the machine. If you can build an automated installer for the application a new software engineer can get up and running in matter of hours and not day(s).
- Updating existing software is easy, if any software in the development stack changes lets say the team decides to use PHP 5.5 from PHP 5.4, the vagrant config is changed all users reload their vagrant machine and all team members have PHP 5.5.
- Installing new software is easy, lets say the team decides to use RabbitMq for messaging. RabbitMq can be added to the vagrant box in the vagrant config and all software engineers reload/reprovision their vagrant machines and all of them get RabbitMq.
- Shared services, configs and file paths, when you use vagrant the code base is in the host machine which is shared with the virtual box. The paths for all the application, application executable, services like nginx, mysql, configuration of the applications like error reporting in php.ini and even passwords like mysql root password are shared and consistent.
Vagrant lingo
To know Vagrant better you need to wrap your head around the Vagrant jargon. Here are some basic and important ones:Boxes
A box is a package containing a representation of a virtual machine running a specific operating system, for a specific Provider. You can find a list of boxes and start playing with them.Provider
Providers are software responsible for creating and managing the virtual machines used by Vagrant. VirtualBox and Vmware are popular ones. For this example we will use VirtualBox.
Provisioner
Provisioners are used to set up the virtual server, installing all necessary software and executing different commands in sequence. The most used provisioners are Puppet, Chef and Ansible. Shell Script is also a very common option. We will use Puppet for this example and a survey says its used the most.
Vagrantfile
Vagrantfile is the main entry point file to build the vagrant virtual box, it is used to define the base box and other config like the memory to allocate to the virtual machine etc. Other configs like host, forwared port, synced folder etc on this file.
More on Vagrant
Vagrant is very useful software to have a standard and consistent development environment shared among the team of software engineers. It capsules the software stack and its config with users in a virtual box which is portable and easily reproducible. If you want to know more about refer to the official docs and this series by Erika Heidi in part 1, part 2 and part 3 is also great to know more about Vagrant.Vagrant also has alternatives, while many may argue that comparing Vagrant and Docker is comparing apples and oranges. In case of having a virtual machine for dev only they can be the two alternatives. Some early problems I faced with docker is, because it is a Linux container data persistence is an issue. Also for the development environment I don't think that linking 4 containers to get PHP, MySql, RabbitMq, Redis working is really practical.
Google Trends - Web Search interest: vagrant, docker - Worldwide, Jun 2013 - May 2014 #googletrendsexplore
— Geshan Manandhar (@geshan) July 5, 2014If you look at the current popularity in Google they are performing head to head.
PHP (LEMP) on vagrant, the easiest way
In context of this post I will build and run a vagrant virtual box with LEMP - Linux Nginx Mysql and PHP with a GUI vagrant box builder Puphpet.com. It is the easiest way as you just need to select what you need from the GUI get the file, then run vagrant up and you are done.This recipe is based on Network File System (NFS) to share the project files from a Linux host machine which does not work in Windows. For this tutorial you will need to download and install the following prerequisites.
How you install the above two will depend on your OS and if the OS is 32 bit or 64 bit. TO get NFS on your Ubuntu run : sudo apt-get install nfs-server.
After you have VirtualBox, Vagrant and NFS server installed on your host machine (main system preferably Ubuntu), then you can go to Puphpet.com.
In the next section Server Packages, I added vim, git-core, htop and curl. You can add the packages you need.
You can skip the firewall section, in the WebServers section select Nginx, and define if you need more virtual hosts. Awesome.dev is already added for you, if you need SSL that can also be checked.
In the Language section you can select PHP with version 5.5, do add the PHP module you need like gd, mysql etc. I highly recommend you to check 'XDebug' to use it with an IDE like PHPStorm or NetBeans.
In the databases section you should select MySQL and add new databases if you need it, be sure of the root password. I would recommend downloading and installing PhpMyAdmin later with a different virtual host added to the config.yaml file later. If you need Redis, click Redis and check 'Install Redis' as well.
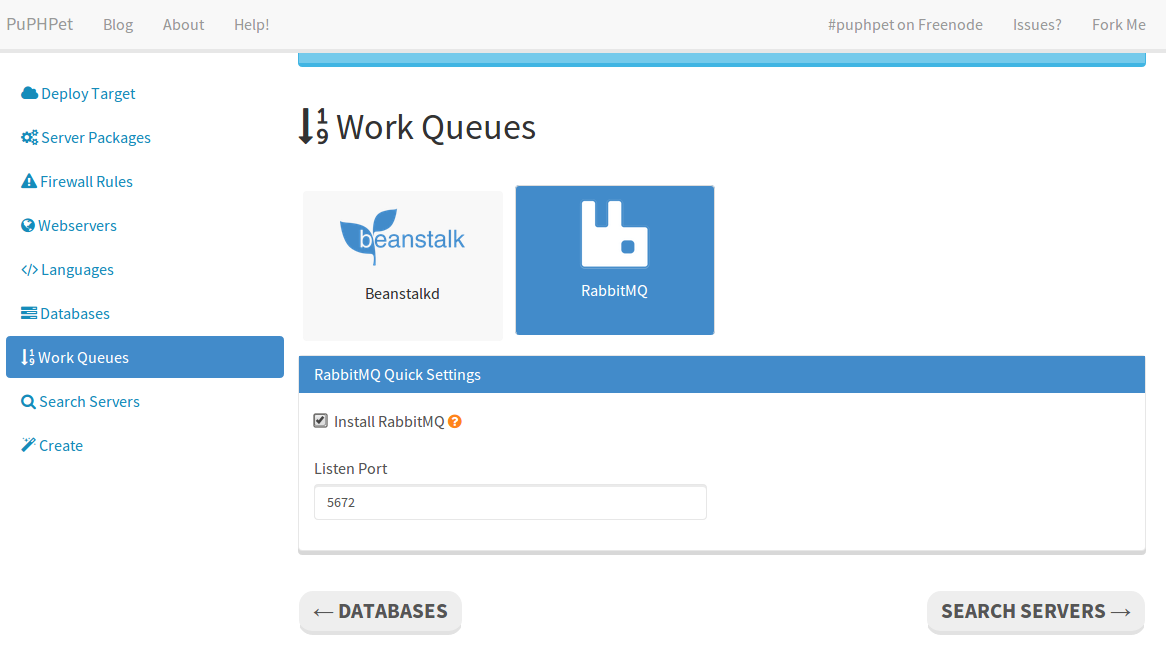
If you need RabbitMq you can install it in the next "Work Queues" section. Click "Work Queues" then "RabbitMQ" after than check "Install RabbitMQ":
In the next section you can install "Elastic Search" if you need it as below:
Then you can download your Vagrant configuration as a zip file as below:
After you get the 'puphpet.zip' named zip file unzip it, to get a randomly named folder like 'NGX2Rz', which will have the Vagrantfile and puphpet folder which has all the config for all the software stack selected in the GUI like below:
I recommend creating a 'projects' folder in you home so it will be /home//projects and rename the NGX2Rz folder to vagrant then move /home//projects folder. So you wll have /home//projects/vagrant and your projects lets say my-project at /home//projects/my-project.
Then go to /home//projects/vagrant which will have the Vagrantfile and puphpet folder, then run vagrant up to build your machine. You should get an output like this gist it will take some time to download the box depending on your internet speed and some more time to build the machine.
While the machine is being download and built, you can add the new hosts to your /etc/hosts. Add
192.168.56.101 vagrant.dev
192.168.56.101 awesome.dev
Then after the machine is up you can access awesome.dev provided the folders are placed correctly and the nginx virtual host is fine. If you have installed Rabbit MQ you can access the management plugin at http://vagrant.dev:15672 .
If you want to check the virtual machine or execute commands in the new virtual box managed by Vagrant you can do a vagrant ssh and login to the virtual box with SSH. You will see a bash like below:
You can try htop command to check what is running on the machine. To get started with Vagrant Scotch and Brian also have good blog posts.
Conclusion
Vagrant is an amazing tool that enables producing portable, reproducible and consistent virtual development environment that can be shared with a team of software engineers. It saves you from installing the right version of PHP, MySQL and other needed software in the stack. You should really give it a try and move all your projects to Vagrant.
PS: This is my 200th blog post and it has been more than 7 years I started blogging.


